![[내일 배움캠] 깃허브 Profile 만들기 & 꾸미기](https://img1.daumcdn.net/thumb/R750x0/?scode=mtistory2&fname=https%3A%2F%2Fblog.kakaocdn.net%2Fdn%2FWIYDn%2FbtrrhFpB0Vz%2FFLq8e3gXNeHl6g8RtgRVz1%2Fimg.png)
발단 : 오시영 튜터님이 김치찌개 레시피와 소스 트리만 남겨주시고 깃허브 프로필은 남겨주시지 않아 내 깃허브 프로필이 가독성이 떨어진다는 생각도 없이 생활을 하던 중 캠프 생활의 빛과 소금 JerryKim님의 소개로 프로필을 꾸밀 수 있다는 것을 알게 되었다.

** 준비물 : Github id, 잠시 복사 붙여 넣기 할 메모장

< PART 1 >
1. 자신의 ID와 같은 이름의 Repository를 먼저 생성
- Repository 생성 시 꼭 README.md 파일을 만들 것


2. README.md 파일에 밑의 코드 스니펫 내용 붙여넣기
- 코드 박스 우측 상단 코드 스니펫 딸깍
<div align=center>
<p>
<a href="https://dawnpast12.tistory.com/category/TIL" target="_blank"><img src="https://img.shields.io/badge/Blog-DD0B78?style=flat-square&logo=GitHub%20Sponsors&logoColor=white"/></a>
<a href="mailto:nmdkims@gmail.com" target="_blank"><img src="https://img.shields.io/badge/nmdkims@gmail.com-EA4335?style=flat-square&logo=Gmail&logoColor=white"/></a>
<a href="https://www.linkedin.com/in/%ED%9B%88%ED%9D%AC-%EA%B9%80//" target="_blank"><img src="https://img.shields.io/badge/nmdkims-0A66C2?style=flat-square&logo=Linkedin&logoColor=white"/></a>
</p>
<p>
Hello I am a new developer specializing in machine learning.<br/>
We are working on it based on Python DJango.<br/><br/>
I enjoy squash, Baduk and computer game. <br/>
My goal is to develop services that will make life easier.. ✨ <br/><br/>
</p>
<img height="180em" src="https://github-readme-stats.vercel.app/api?username=nmdkims&show_icons=true&hide_border=true&&count_private=true&include_all_commits=true" /> 
## Platforms & Languages
<p>
<img src="https://img.shields.io/badge/java-007396?style=for-the-badge&logo=java&logoColor=white">
<img src="https://img.shields.io/badge/c++-00599C?style=for-the-badge&logo=c%2B%2B&logoColor=white">
<img src="https://img.shields.io/badge/python-3776AB?style=for-the-badge&logo=python&logoColor=white">
<br>
<img src="https://img.shields.io/badge/html5-E34F26?style=for-the-badge&logo=html5&logoColor=white">
<img src="https://img.shields.io/badge/css-1572B6?style=for-the-badge&logo=css3&logoColor=white">
<img src="https://img.shields.io/badge/javascript-F7DF1E?style=for-the-badge&logo=javascript&logoColor=black">
<img src="https://img.shields.io/badge/jquery-0769AD?style=for-the-badge&logo=jquery&logoColor=white">
<br>
<img src="https://img.shields.io/badge/mongoDB-47A248?style=for-the-badge&logo=MongoDB&logoColor=white">
<img src="https://img.shields.io/badge/django-092E20?style=for-the-badge&logo=django&logoColor=white">
<img src="https://img.shields.io/badge/flask-000000?style=for-the-badge&logo=flask&logoColor=white">
<img src="https://img.shields.io/badge/bootstrap-7952B3?style=for-the-badge&logo=bootstrap&logoColor=white">
<br>
</p>
<p>
<img src="https://img.shields.io/badge/github-181717?style=for-the-badge&logo=github&logoColor=white">
<img src="https://img.shields.io/badge/git-F05032?style=for-the-badge&logo=git&logoColor=white">
</p>
</div>
</div>
출처는 지워주세요

복사 붙여 넣기를 하면 밑의 사진처럼 결과가 나옵니다.
자기가 많이 사용하는 언어 비율을 나타내 주는 부분이 깨져 보이는 것을 볼 수 있습니다.

마크다운 문법의 띄어쓰기 관련된 문제인 것 같지만 지금 중요한 건 결과가 똑바로 나오지 않는다는 문제뿐 입니다.
그렇다면 똑바른 결과를 나오게 진행해보겠습니다.
결과 값을 위하여 우리는 3곳의 위치에서 총 5번의 엔터만 치면 됩니다.( | 커서 위치 )
* 5번째 줄 별 표시 옆 <p>|: 여기서 Enter 두 번

* 바로 밑에 줄 | ## : 여기서도 Enter 두 번

* 그 바로 옆 Languages| : Enter 한번


여기서 플랫폼과 언어를 나타내는 shield badge 부분을 제외한 5군데는 자신의 블로그, 이메일, 링크드인, 깃허브 아이디 값으로 바꾸어 주어야 한다.
찾아 바꾸기 용 코드 스니펫 딸깍
Blog
https://dawnpast12.tistory.com/category/TIL
nmdkims@gmail.com
https://www.linkedin.com/in/%ED%9B%88%ED%9D%AC-%EA%B9%80Linkedin 파란 배지 위에 글씨도 수정해주세요 현재는 nmdkims으로 되어있습니다.
Github ID
nmdkims
물론 사용 안 하는 것은 다른 것으로 커스텀하여 사용하면 된다.
MarkDown badge custom 참고 사이트 :
Shields.io: Quality metadata badges for open source projects
Love Shields? Please consider donating to sustain our activitiesYour BadgeStaticUsing dash "-" separator/badge/ - - Dashes --→- DashUnderscores __→_ Underscore_ or Space → SpaceUsing query string parameters/static/v1?label= &message= &color= Colo
shields.io
Stat custom 참고 사이트:
https://github.com/anuraghazra/github-readme-stats
GitHub - anuraghazra/github-readme-stats: Dynamically generated stats for your github readmes
:zap: Dynamically generated stats for your github readmes - GitHub - anuraghazra/github-readme-stats: Dynamically generated stats for your github readmes
github.com
< /PART 1 >
< PART 2 >
PART 2는 gist를 사용하여 Pined repo의 값을 밑의 사진처럼 바꿔주는 것이다.
왼쪽은 커밋 시간의 통계를 나타내어주며 오른쪽은 깃 스탯을 보여준다.

두 개 작업의 흐름은 같지만 깃 스탯에서 값이 가끔 나오지 않는 모습을 보일 수 있어. yml 파일을 수정해야 할 수 있다 후에 기입하겠다.
기본적인 흐름은 사전 작업 1~4번과 세팅 작업 5~9로 나눠진다.
사전 작업에서 필요한 정보는 2가지이다. GIST_ID, GH_TOKEN
1. gist.github.com로가서 public으로 gist를 생성한다.
- 생성 시 이름과 내용은 gist가 동작할 때 자동으로 업데이트되므로 신경 쓰지 않아도 된다.

2. 메모장을 열어서 생성한 gist의 url 일부를 GIST_ID로 메모해 놓는다.

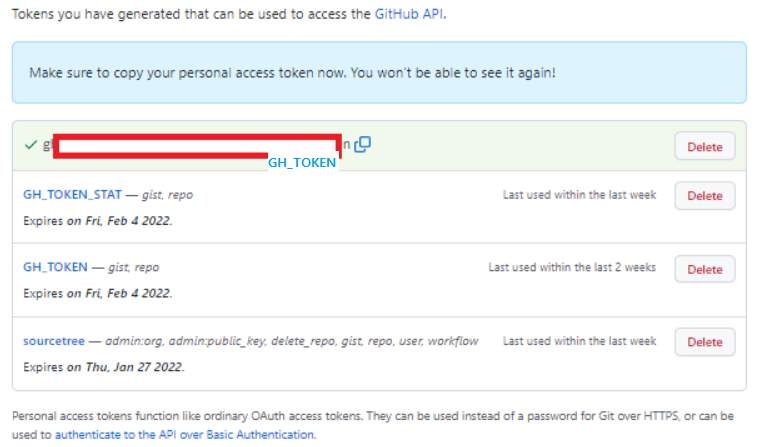
3. New personal access token (github.com)를 활성화하여 token을 발급한다. 이때 발급된 값은 한번 웹페이지를 종료하게 되면 다시 값을 얻을 수 없으니 꼭 저장해서 메모장에 GH_TOKEN로 메모해 놓도록 한다.

4. 두 개를 다 적어 놓았다면 사전 작업 끝

그리고 라이브러리를 fork 해옵니다. 밑의 코드 스니펫 딸깍
한 번에 하나씩 하시면 됩니다.
FOR LIBRARY IN LIBRARIES
커밋 시간 통계 라이브러리
https://github.com/maxam2017/productive-boxStat 라이브러리
https://github.com/bokub/github-stats-box

5. fork 해본 repository에 Action탭을 enabled과 workflow enable 시킨다.
- 밑에 내용을 차례대로 수행한다.


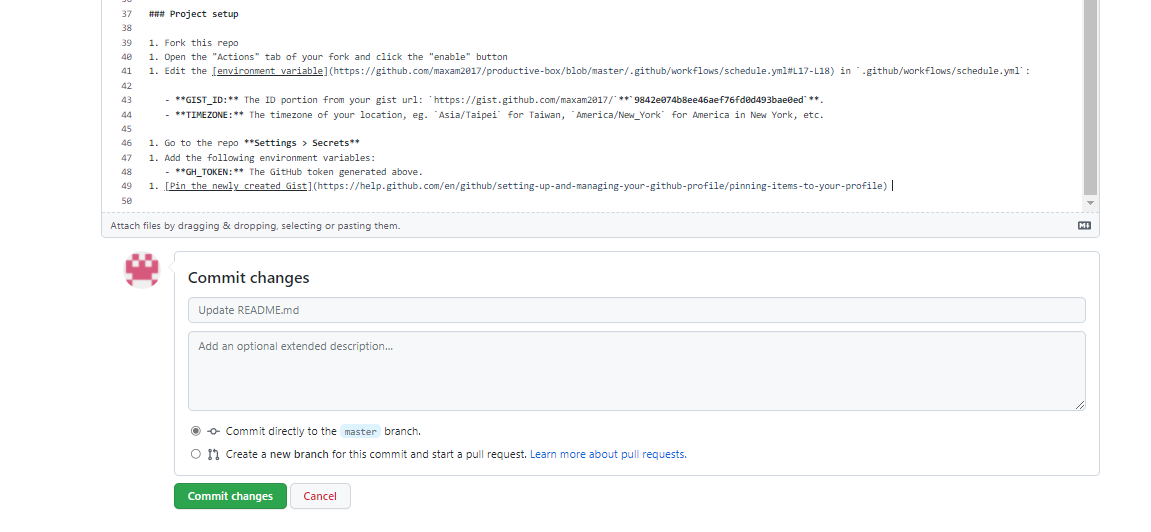
6. github/workflow/Schedule.yml 파일 수정 GIST_ID, TIMEZONE OR GIST_ID, ALL_COMMITS, K_FORMAT
IF LIBRARY == COMMIT_TIME
- 커밋 시간 통계 라이브러리 일 경우
- GIST_ID : 메모장에 복사해둔 gist url
- TIMEZONE: Asia/Seoul
ELIF LIBRARY == STAT
- Stat 라이브러리일 경우
- GIST_ID : 메모장에 복사해둔 gist url
- ALL_COMMITS: true일 경우 나의 전체 커밋을 카운트하고, false일 경우 작년 커밋만을 카운트한다.
- K_FORMAT: true일 경우 1.5k와 같이 숫자를 “k”로 포맷팅 하여 노출한다.

7. Setting -> Secrets New repository secret


8. Customize your pins 골라서 gist 등록


9. 파일의 일부 변화주기
- README 파일에 스페이스 치고 COMMIT CHANGE
- Action은 1시간에 한번 갱신되나 변경점이 있을 때 즉시 적용됨

각 라이브러리당 한 번씩 수행합니다. 첫 번째 라이브러리가 완료되었으면 1번으로 돌아가세요.
< /PART 2 >
여기까지 같이 해보는 깃허브 프로필 만들기였습니다.
'DevLog' 카테고리의 다른 글
| [PYTHON] 가상환경 사용하기 (0) | 2022.02.10 |
|---|---|
| [PYTHON] path 환경 변수 설정 (0) | 2022.02.10 |
| [WIL]머신러닝 - 4주차 강의 개발일지 (0) | 2022.01.11 |
| [WIL]머신러닝 - 3주차 강의 개발일지 (0) | 2022.01.11 |
| [WIL]머신러닝 - 2주차 강의 개발일지 (0) | 2022.01.11 |